Saturday 13 October 2012

From Plot to Pot V: Preserving ragout


Today I'm preparing a large portion of ragout for preserving. It's great to have some jars handy for days you don't have time for cooking or you don't feel like peeling and chopping and boiling and frying. Huge marrows and courgettes are perfect for this. Aubergines and pumpkins are great, too. 

I use: 
- 1 large marrow
- a few tomatoes (I picked them green some days ago and they ripened in a bowl at home)
- a handful of garlic cloves (needless to say that I love garlic...)
- some red and white onions
- 2 tins of chopped tomatoes (I wish I had more tomatoes from the allotment - next year!)
- chopped parsley and thyme (frozen - see earlier post)
- dried herbs de provence 
- salt and pepper

I prepare everything in a pressure cooker. For this I add oil and fry the garlic and onions until glassy.

 I then add the rest of the ingredients, marrows chopped into chunky bits. Here in the photo with the parsley and thyme on top. Mix everything well, close the lid and bring to pressure. It then takes no more than 5min until all ingredients are soft and tender. 

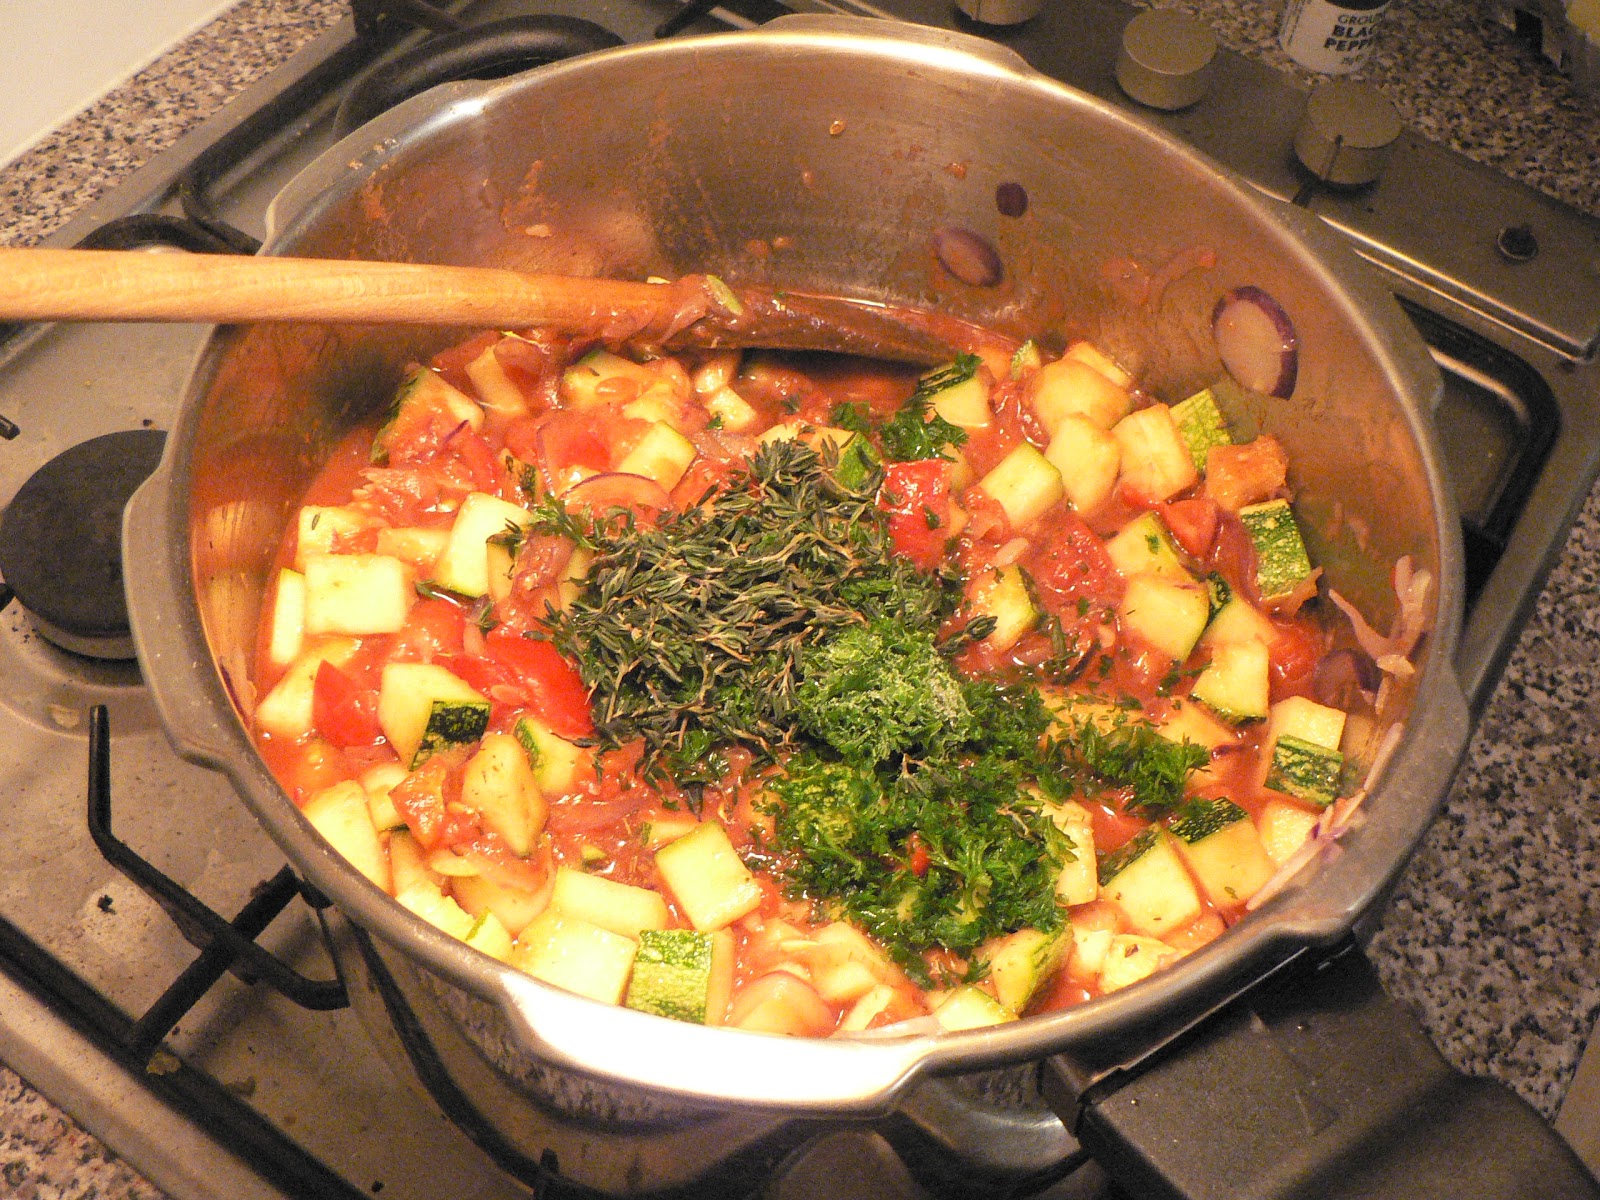
In the meantime sterilise some jars, I keep those from the shops, saves you buying new ones as well as resources. Fill them level while jars and ragout are still hot and close quickly. Take care to clean rims before closing. 

Another tip: If you want to make sure you create a vacuum in the jars you can add a thin layer of alcohol (40% upwards) on top of your preserves (this method only works with preserves of a firm consistency; great for jams, too). The amount of alcohol depends on how full you filled the glass. Light it with a match or lighter and quickly close the lid. The flame will use up the rest of the oxygen in the glass and then extinguish, thus creating the vaccuum. There needs to be enough alcohol to use up all the oxygen but at the same time there shouldn't be much more or the alcohol will remain in the jar. You will see, it's not too difficult to estimate the right amount. 


                                                          Voila!


Sunday 7 October 2012

From Plot to Pot IV: Chard is delicious!

Chard grown in a raised bed. You can snap off the outer leaves only and keep harvesting for longer.

 Chard is one of my favourite vegetables. It can be used like spinach and it's very versatile. It's great in lasagne, curries, pasta sauces, simply stewed, raw in salads, with fish and meat. 

It contains many vitamins and minerals such as Vitamin Bs, C, K, A and iron, calcium, potassium. The young leaves can be eaten raw in salads, keeping all these nutrients intact. 

More mature leaves should be blanched and make a great addition to many dishes. 

Today I'm going for something a bit more fancy and amazingly delicious: spaetzle with a chard-gorgonzola sauce.


Spaetzle are traditional Swabian egg pasta and are prepared in a particular way. A specific tool is nowadays used for convenience sake, however, if you don't have a spaetzle grater you can also prepare them the traditional way.

For 2 portions you prepare a dough from           for 4 portions:
- 250g flour (I use bread flour)                          - 500g flour
- 3 medium-sized eggs                                      - 5 eggs
- 70-120ml water (or milk)                                - 150-200ml water
- a pinch of salt.                                               - double the pinch

spaetzle grater
Whisk till you get a smooth consistency. The dough should be thick but still runny, a bit firmer than pancake batter. Bring a large pot of water to boil and add some salt. Once the water is bubbly-boiling get your spaetzle grater out and fill with dough. Then start grating briskly to get small and knobbly spaetzle. If you don't have such a grater you can try the traditional way of putting some dough onto a chopping board. You then 'grate' small pieces of dough 

perfect spaetzle
with a knife into the boiling water. Takes a bit of practice to get small ones but the taste is still the same! Leave them to boil for another 2-3 min, then strain them. They are ready to eat now but I prefer to fry them a bit to give them that extra something.

For the sauce you need: 

- fresh chard                - a dash of cream
- 1 gorgonzola              - salt/pepper
- garlic and onion         - paprika powder


Blanch the chopped chard. Fry the onions and garlic. I tend to fry the thick parts of the stems together with the onions. Add all other ingredients and simmer until the gorgonzola has melted into a creamy consistency. Top the spaetzle with the sauce and serve! Again, it's fast and easy (at least if you have a spaetzle grater handy, the traditional method will take you longer). 

Most of all it's incredibly delicious......


Saturday 29 September 2012

From Plot to Pot III: A wonderful harvest

 Chard, marrows, beans, courgettes, beetroots, onion, garlic, parsley and lettuce - what a wonderful harvest.

Today we are going to cook a vegetarian stew from all these deliciously fresh vegetables.

First, chop and fry garlic and onions. Add water, bring to a boil and add your vegetables of choice. Some vegetable stock, pepper, eventually curry (or anything else you fancy for that matter) for seasoning and couscous for thickening. Let everything simmer until tender. Fresh herbs such as parsley, thyme and coriander round this simply tasty stew off.

Keeping it simple always works!

Monday 24 September 2012

From Plot to Pot II: Pickled Superstar

This week's 'From Plot to Pot' presents Beetroot in the leading role. Charming and versatile as she is, I am trying to turn you into a fan as well. Through its many health benefits beetroot has gained more and more popularity in recent years, reaching status of a 'super food'. Here are some of the ingredients that turn this earthy lady into a superstar:
potassium, magnesium, iron, vitamin A, B6, C, folic acid, protein, antioxidants and soluble fibre.

Its high contents of vitamin C helps to absorb the iron. Not only the root itself contains iron but its leaves, too, and for this matter young beetroot leaves make a better source of iron than spinach. So, next time don't waste it, eat it. The variety of vitamins and nutrients help boosting your immune system as well as stimulating the reoxidation of cells and the production of new blood cells. What it's often best known for today is its immediate effect it has on  high blood pressure as well as increasing your stamina.


So, if this doesn't sounds great, then let's see what we can do with it. Beetroot is great eaten raw, keeping all those vitamins and nutrients intact. Therefore we start with a simple beetroot salad.

 Ingredients are again freshly picked produce from our very own community plot: Butterhead lettuce, garlic, onion, carrots, parsley, and of course the beets! One 'Golden Burpee's' and one 'Chioggia Pink'.

And look how beautiful they are on the inside! Well, you shouldn't judge from the outside anyway, should you?

Quite distinctly different in taste, too! Chioggia Pink has this very characteristic earthy taste, slightly bitter, whereas Golden Burpee's on the other hand tastes slightly sweet, which makes it great for eating raw.
Let's do it then! Chop your veg, grate the beets, quick simple dressing (oil, (balsamic) vinegar, salt, pepper, paprika powder; yoghurt dressing works great, too) and a healthy 5-minute salad to enjoy is done.
(Yes, admittedly, there is some non-homegrown corn in there, but we'll ignore that for a minute...)


 Next are some home-made quick and easy pickles. Here a photo only to compare, these beets are huge, look at them! Take four of those, makes 1,5kg together, boil them as a whole. A Pressure cooker is fantastic here, done in 15min, saving time and energy. Meanwhile bring the vinegar to boil, add spices according to your liking. In this case whole black pepper corns, mustard seeds, bay leaves. Once the beets are cooked the skin comes off easily and you can chop them into slices, as thick or thin as you prefer.
Sterilise your jars with boiling water, fill in your beets and pour the still hot vinegar-spices mixture on top. Close lids and leave to proof for at least 3 weeks. As you can see most of the colour has drained out of these Chioggia Pink, leaving only the pickling juice in bright rose. Quite interesting...

Sunday 16 September 2012

From Plot to Pot I

Follow our new weekly series 'From Plot to Pot' during harvesting season: see how fresh veg from community gardens and foraged foods are transformed into some delicious meals, jams and preserves. Today we present 'From Plot to Pot in 4 hours'. At the Campus Farm we are busy with building more and new raised beds (photos soon to follow), we sowed spinach and lamb's lettuce for winter crops and, of course the best part: harvesting!

Some butterhead lettuce, parsley, green tomatoes, marigolds and nasturtiums, dill, 2 carrots "Parisian Market", small peppers, a handful of rasperries, waxy potatoes and chard.


The marigolds go straight to dry (joining some sage and french beans):
Marigolds (Calendula officinalis) are great for making tea and ointments. Marigold Flower Tea is a cleansing and detoxifying herb with anti-fungal, anti-viral and antibiotic activity. It's strongly anti-inflammatory and healing. The tea can also help to regulate women's menstrual periods and benefits the immune and lymphatic systems.
Ointments are ideal for healing cuts, scrapes, lacerations, surgical wounds and scars and small infected wounds. It's useful for skin conditions such as acne, dermatitis, eczema sores, impetigo spots and other systemic fungal, bacterial and viral conditions.


Parsley and Dill are immediately chopped and frozen - creates your own source of fresh herbs for throughout the winter. It's so easy:


 For dinner, quick and easy, a peasant's meal: fried potatoes with dill and parsley, tzatziki, salad with carrots, green peppers, decorated with nasturtiums and raspberries for dessert. Simple and delicious.

Saturday 1 September 2012

Permaculture Design Course @ Apricot Centre

Are you interested in Permaculture? Maybe you have already attended a short introduction course and now you are craving for more?

The Apricot Centre near Manningtree is offering a full Permaculture Design Course to teach you all the basics. The PDC course covers:
Permaculture principles and ethics - Renewable energy and sustainable building - Simple vegetable growing and fruit growing - Forest gardening - Simple livestock management - Woodland and timber - Transition movement - Design skills - All delivered with creative and practical teaching methods.

The PDC is a 12 day course starting and ending with a full weekend, running on Saturdays (and sometimes for whole weekends) through the autumn, winter and spring of 2012/13.

For more information visit their website.


Sunday 12 August 2012

New Veg Box Scheme launched!

Residents in the Colchester area are lucky to have access to locally grown vegetables thanks to Danny and Meg at Bennison Farm in Thorrington and their Community Supported Agriculture scheme.

To find out more contact the farm bennisonfarm@gmail.com 

This video explains how one such scheme in Devon works:


Monday 9 July 2012

It's Elderflower time!

I love this time of year: Summer's approaching fast and we get to harvest some delicious fruits and first crops. Many plants are flowering now and so is the elder tree. 

Many myths have been spun around the elder tree in European folklore and Pagan religion. It is often associated with the mother goddess, or more specifically, the ancient vegetation goddess Hylde Moer. Elders were often planted next to the house in order to drive away evil spirits and all of its parts have been used for medicinal purposes. Read more here.

We collected about 12 umbels from the red-coloured elderbush (the first and only bush we've seen of this kind) and about 25 umbels from the white ones. Mixed with water, sugar, citric acid and some organic, unwaxed lemons we let them sit for about 3 to 4 days to infuse. Once strained it's a delicious and refreshing drink for the summer! 


 A guideline recipe: 

• 35 fresh elder flower heads – always pick the sweet smelling ones (which tend to be a bit buttery in colour and which do not drop petals when shaken)
• 2 lemons, also rough sliced
(additionally: 2 oranges, rough sliced)

• 2oz citric aci
• 3 pints boiling water
• 3lb granulated sugar, (if you are worried about your sugar intake, you can use the equivalent of granulated Splenda (it is very light so follow the instructions which substitute volume for weight….)
Add some ice and enjoy sipping in the shade after a hard day's work in the garden.

Sunday 27 May 2012

Experiment: Late Potatoes in Raised Beds

This is an experiment to grow some late potatoes in no-dig raised beds. The patch of land has been covered with cardboard over the winter and the weeds have died down nicely. 30 wheelbarrow trips to get enough compost for 6 raised beds later, voila:

  After getting the unchitted potatoes (waxy varieties) into the ground, right on top in the middle, I covered them with grass clippings as mulch to retain moisture.

Here you can see some more individual raised heaps for courgettes, marrows and pumpkins.
Now let's wait and see...

Friday 17 February 2012

Permaculture - an introduction 28th April

Want to find out more about permaculture and see some aspects of it in action?
There will be a short introductory course at the Big Garden on Saturday 28th April led by Permaculture Diploma students Ben Lambert with Bob Mehew. Places are limited so please get in touch if you are interested: jo.wheatley@colchester.gov.uk